Spring Core Tutorials

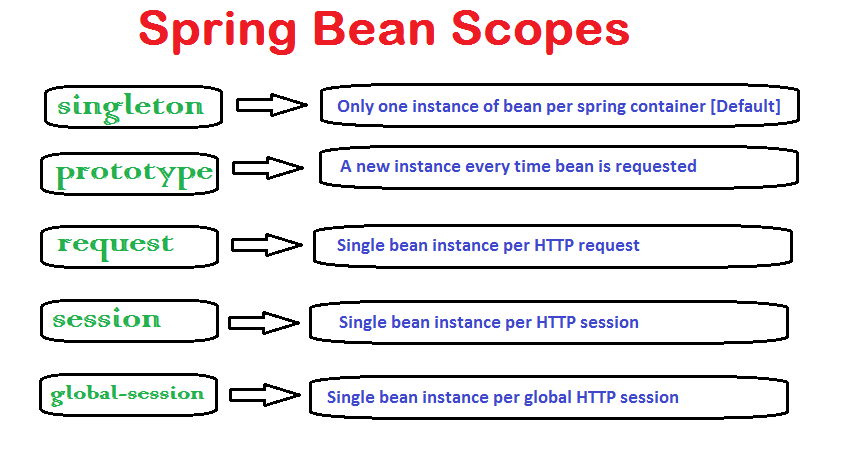
Spring bean scopes
概念
example
xml:
1 2 3 4 5 6 7 8
| <beans xmlns="http://www.springframework.org/schema/beans" xmlns:xsi="http://www.w3.org/2001/XMLSchema-instance" xsi:schemaLocation="http://www.springframework.org/schema/beans http://www.springframework.org/schema/beans/spring-beans-2.5.xsd"> <bean id="demoBean" class="com.howtodoinjava.application.web.DemoBean" scope="session" /> </beans>
|
annotation:
1 2 3 4 5 6
| @Service @Scope("session") public class DemoBean { }
|
Spring bean life cycle
Spring框架提供4种控制bean生命周期的方式。
- InitializingBean和DisposableBean回调接口
- 其它特定行为的Aware接口
- 配置文件中使用init()和destroy()方法
- @PostConstruct和@PreDestroy注解
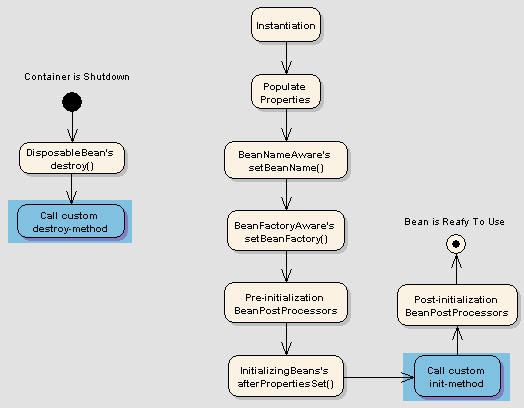
InitializingBean和DisposableBean回调接口
不推荐使用,因为与Spring框架紧密耦合。
Example
1 2 3 4 5 6 7 8 9 10 11 12 13 14 15 16 17 18 19
| import org.springframework.beans.factory.DisposableBean; import org.springframework.beans.factory.InitializingBean; public class DemoBeanTypeOne implements InitializingBean, DisposableBean { @Override public void afterPropertiesSet() throws Exception { } @Override public void destroy() throws Exception { } }
|
配置文件中使用init()和destroy()方法
推荐
Example
1 2 3
| <beans> <bean id="demoBean" class="com.howtodoinjava.task.DemoBean" init-method="customInit" destroy-method="customDestroy"></bean> </beans>
|
全局制定
1 2 3
| <beans default-init-method="customInit" default-destroy-method="customDestroy"> <bean id="demoBean" class="com.howtodoinjava.task.DemoBean"></bean> </beans>
|
@PostConstruct和@PreDestroy注解
@PostConstruct在对象调用构造函数之后,在返回给请求对象之前调用。
@PreDestroy在Bean被容器销毁之前调用。
Example
1 2 3 4 5 6 7 8 9 10 11 12 13 14 15 16 17
| import javax.annotation.PostConstruct; import javax.annotation.PreDestroy; public class BemoBeanTypeFour { @PostConstruct public void customInit() { System.out.println("Method customInit() invoked..."); } @PreDestroy public void customDestroy() { System.out.println("Method customDestroy() invoked..."); } }
|
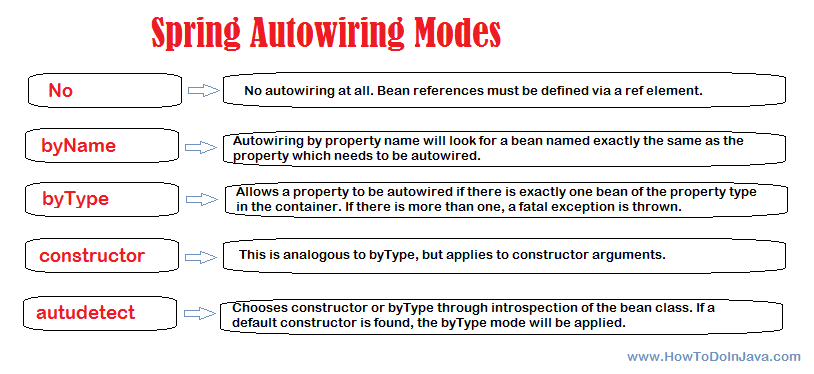
Spring Beans Autowiring
Example
xml:
1 2 3 4 5 6 7 8 9 10 11 12 13 14 15 16 17 18 19 20
| <?xml version="1.0" encoding="UTF-8"?> <beans xmlns="http://www.springframework.org/schema/beans" xmlns:xsi="http://www.w3.org/2001/XMLSchema-instance" xmlns:context="http://www.springframework.org/schema/context" xsi:schemaLocation="http://www.springframework.org/schema/beans http://www.springframework.org/schema/beans/spring-beans-3.0.xsd http://www.springframework.org/schema/context http://www.springframework.org/schema/context/spring-context-3.0.xsd"> <context:component-scan base-package="com.howtodoinjava" /> <bean id="employee" class="com.howtodoinjava.demo.beans.EmployeeBean" autowire="byName"> <property name="fullName" value="Lokesh Gupta"/> </bean> <bean id="departmentBean" class="com.howtodoinjava.demo.beans.DepartmentBean" > <property name="name" value="Human Resource" /> </bean> </beans>
|
annotation:
首先必须开启注解
1
| <context:annotation-config />
|
或者注入Autowire的注解处理器
1
| <bean class ="org.springframework.beans.factory.annotation.AutowiredAnnotationBeanPostProcessor"/>
|
Example
@Autowired可以在field,setting,constructor上使用。byType
1 2 3 4 5 6 7 8 9 10 11 12 13
| public class EmployeeBean { @Autowired private DepartmentBean departmentBean; public DepartmentBean getDepartmentBean() { return departmentBean; } public void setDepartmentBean(DepartmentBean departmentBean) { this.departmentBean = departmentBean; } }
|
使用@Qualifier解决冲突
Example
1 2 3 4 5 6 7 8 9 10 11 12 13 14
| public class EmployeeBean { @Autowired @Qualifier("finance") private DepartmentBean departmentBean; public DepartmentBean getDepartmentBean() { return departmentBean; } public void setDepartmentBean(DepartmentBean departmentBean) { this.departmentBean = departmentBean; } }
|
1 2 3 4 5 6 7 8 9
| <bean id="humanResource" class="com.howtodoinjava.autowire.constructor.DepartmentBean" > <property name="name" value="Human Resource" /> </bean> <bean id="finance" class="com.howtodoinjava.autowire.constructor.DepartmentBean" > <property name="name" value="Finance" /> </bean>
|
使用required=false可选关联
1 2 3
| @Autowired (required=false) @Qualifier ("finance") private DepartmentBean departmentBean;
|
Loading External Resources
可以实现ApplicationContextAware或者ResourceLoaderAware
1 2 3 4 5 6 7 8 9 10 11 12 13 14 15 16 17 18 19 20 21 22 23 24 25 26 27 28 29 30 31 32 33
| import java.io.BufferedReader; import java.io.IOException; import java.io.InputStream; import java.io.InputStreamReader; import org.springframework.context.ResourceLoaderAware; import org.springframework.core.io.Resource; import org.springframework.core.io.ResourceLoader; public class CustomResourceLoader implements ResourceLoaderAware { private ResourceLoader resourceLoader; public void setResourceLoader(ResourceLoader resourceLoader) { this.resourceLoader = resourceLoader; } public void showResourceData() throws IOException { Resource banner = resourceLoader.getResource("file:c:/temp/filesystemdata.txt"); InputStream in = banner.getInputStream(); BufferedReader reader = new BufferedReader(new InputStreamReader(in)); while (true) { String line = reader.readLine(); if (line == null) break; System.out.println(line); } reader.close(); } }
|
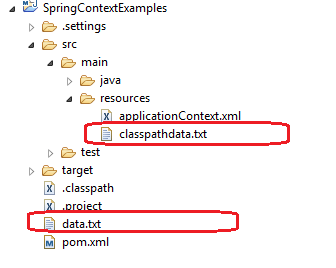
1
| Resource banner = resourceLoader.getResource("file:data.txt");
|
1
| Resource banner = resourceLoader.getResource("classpath:classpathdata.txt");
|
1
| Resource banner = resourceLoader.getResource("file:c:/temp/filesystemdata.txt");
|
1
| Resource banner = resourceLoader.getResource("http://howtodoinjava.com/readme.txt");
|
@Component, @Repository, @Service and @Controller annotations
@Component 当开启组件自动扫描时,将一个java类成为bean组件
@Repository 将DAO注入,同时,将非检查异常替代为更合理的DateAccessException
@Service 将servcie注入
@Controller 将controller注入
Example
1 2 3
| <context:component-scan base-package="com.howtodoinjava.demo.service" /> <context:component-scan base-package="com.howtodoinjava.demo.dao" /> <context:component-scan base-package="com.howtodoinjava.demo.controller" />
|
1 2 3 4 5 6 7 8 9 10 11
| @Controller ("employeeController") public class EmployeeController { @Autowired EmployeeManager manager; public EmployeeDTO createNewEmployee() { return manager.createNewEmployee(); } }
|
Inversion of Control(IOC)
控制反转是面向对象编程中的一种设计原则,通过依赖注入,降低对象之间的耦合度。
通过定义对象之间的抽象关系,在运行期,通过容器注入对象实例。
其中BeanFactory是IOC的容器的核心。

三种bean实例化方法
1 2
| //构造方法 <bean id="exampleBean"/>
|
1 2
| //静态工厂 <bean id="exampleBean" factory-method="createInstance"/>
|
1 2 3 4 5
| //普通工厂方法 <bean id="myFactoryBean" class="..."> <bean id="exampleBean" factory-bean="myFactoryBean" factory-method="createInstance"></bean>
|
BeanFacotry和ApplicationContext
BeanFactory加载bean的定义,实例化bean。维护对象直接的关系,管理bean的生命周期。
ApplicationContext在BeanFacotory的基础上,增加了text messages, load file resources, register events as listeners
常用的ApplicationContext
1 2
| ApplicationContext context = new ClassPathXmlApplicationContext(“bean.xml”); ApplicationContext context = new FileSystemXmlApplicationContext(“bean.xml”);
|
Spring REST JSON
只需要引用jackson到类路径,spring会自动注册Jackson2JsonMessageConvter。当客户端请求时,提供http头部:accept:application/json,就可以返回jason格式的数据。
1 2 3 4 5 6
| <dependency> <groupId>com.fasterxml.jackson.core</groupId> <artifactId>jackson-databind</artifactId> <version>2.4.1</version> </dependency>
|
1 2 3 4 5 6 7 8 9 10 11 12 13 14
| @RestController = @Controller + @ResponseBody @RestController public class EmployeeRESTController { @RequestMapping(value = "/employees/{id}") public ResponseEntity<EmployeeVO> getEmployeeById (@PathVariable("id") int id) { if (id <= 3) { EmployeeVO employee = new EmployeeVO(1,"Lokesh","Gupta","howtodoinjava@gmail.com"); return new ResponseEntity<EmployeeVO>(employee, HttpStatus.OK); } return new ResponseEntity(HttpStatus.NOT_FOUND); } }
|
返回json视图
1 2 3 4 5 6 7 8 9 10
| @Controller public class EmployeeRESTController { @RequestMapping(value = "/employees") public String getAllEmployeesJSON(Model model) { model.addAttribute("employees", getEmployeesCollection()); return "jsonTemplate"; } }
|
更改配置
1 2 3 4 5 6 7 8 9 10 11 12 13 14 15
| @Configuration public class RESTConfiguration { @Bean public View jsonTemplate() { MappingJackson2JsonView view = new MappingJackson2JsonView(); view.setPrettyPrint(true); return view; } @Bean public ViewResolver viewResolver() { return new BeanNameViewResolver(); } }
|
或者XML
1 2 3
| <bean name="viewResolver" class="org.springframework.web.servlet.view.BeanNameViewResolver"/> <bean name="jsonTemplate" class="org.springframework.web.servlet.view.json.MappingJackson2JsonView"/>
|
Spring Rest XML
引入jackson
1 2 3 4 5 6
| <dependency> <groupId>com.fasterxml.jackson.core</groupId> <artifactId>jackson-databind</artifactId> <version>2.4.1</version> </dependency>
|
web.xml
1 2 3 4 5 6 7 8 9 10 11 12 13 14 15 16 17 18 19 20 21
| <!DOCTYPE web-app PUBLIC "-//Sun Microsystems, Inc.//DTD Web Application 2.3//EN" "http://java.sun.com/dtd/web-app_2_3.dtd" > <web-app> <display-name>Archetype Created Web Application</display-name> <servlet> <servlet-name>spring</servlet-name> <servlet-class> org.springframework.web.servlet.DispatcherServlet </servlet-class> <load-on-startup>1</load-on-startup> </servlet> <servlet-mapping> <servlet-name>spring</servlet-name> <url-pattern>/</url-pattern> </servlet-mapping> </web-app>
|
spring-servlet.xml
1 2 3 4 5 6 7 8 9 10 11 12 13 14 15
| <beans xmlns="http://www.springframework.org/schema/beans" xmlns:xsi="http://www.w3.org/2001/XMLSchema-instance" xmlns:context="http://www.springframework.org/schema/context" xmlns:mvc="http://www.springframework.org/schema/mvc" xsi:schemaLocation="http://www.springframework.org/schema/beans http://www.springframework.org/schema/beans/spring-beans.xsd http://www.springframework.org/schema/context/ http://www.springframework.org/schema/context/spring-context.xsd http://www.springframework.org/schema/mvc http://www.springframework.org/schema/mvc/spring-mvc.xsd"> <context:component-scan base-package="com.howtodoinjava.demo" /> <mvc:annotation-driven /> </beans>
|
EmployeeVO.java
Java内置了JAXB,会自动加载JaxbRootElementHttpMessageConverter
1 2 3 4 5 6 7 8 9 10 11 12 13 14 15 16 17 18 19 20 21 22 23 24 25 26 27 28 29 30 31 32 33 34 35 36 37 38 39 40 41 42 43 44 45
| import java.io.Serializable; import javax.xml.bind.annotation.XmlAccessType; import javax.xml.bind.annotation.XmlAccessorType; import javax.xml.bind.annotation.XmlAttribute; import javax.xml.bind.annotation.XmlElement; import javax.xml.bind.annotation.XmlRootElement; @XmlRootElement (name = "employee") @XmlAccessorType(XmlAccessType.NONE) public class EmployeeVO implements Serializable { private static final long serialVersionUID = 1L; @XmlAttribute private Integer id; @XmlElement private String firstName; @XmlElement private String lastName; @XmlElement private String email; public EmployeeVO(Integer id, String firstName, String lastName, String email) { super(); this.id = id; this.firstName = firstName; this.lastName = lastName; this.email = email; } public EmployeeVO(){ } @Override public String toString() { return "EmployeeVO [id=" + id + ", firstName=" + firstName + ", lastName=" + lastName + ", email=" + email + "]"; } }
|
controller
@RestController表示返回的结果作为body
JAXB指定返回XML
通过ResponseEntity封装,可以返回HTTP状态。
1 2 3 4 5 6 7 8 9 10 11 12 13 14 15 16 17 18 19 20 21 22
| import org.springframework.http.HttpStatus; import org.springframework.http.ResponseEntity; import org.springframework.web.bind.annotation.PathVariable; import org.springframework.web.bind.annotation.RequestMapping; import org.springframework.web.bind.annotation.ResponseBody; import org.springframework.web.bind.annotation.RestController; import com.howtodoinjava.demo.model.EmployeeListVO; import com.howtodoinjava.demo.model.EmployeeVO; @RestController public class EmployeeRESTController { @RequestMapping(value = "/employees/{id}") public ResponseEntity<EmployeeVO> getEmployeeById (@PathVariable("id") int id) { if (id <= 3) { EmployeeVO employee = new EmployeeVO(1,"Lokesh","Gupta","howtodoinjava@gmail.com"); return new ResponseEntity<EmployeeVO>(employee, HttpStatus.OK); } return new ResponseEntity(HttpStatus.NOT_FOUND); } }
|
Spring RestTemplate
controller
1 2 3 4 5 6 7 8 9
| @RequestMapping(value = "/employees/{id}") public ResponseEntity<EmployeeVO> getEmployeeById (@PathVariable("id") int id) { if (id <= 3) { EmployeeVO employee = new EmployeeVO(1,"Lokesh","Gupta","howtodoinjava@gmail.com"); return new ResponseEntity<EmployeeVO>(employee, HttpStatus.OK); } return new ResponseEntity(HttpStatus.NOT_FOUND); }
|
使用RestTemplate
1 2 3 4 5 6 7 8 9 10 11 12
| private static void getEmployeeById() { final String uri = "http://localhost:8080/springrestexample/employees/{id}"; Map<String, String> params = new HashMap<String, String>(); params.put("id", "1"); RestTemplate restTemplate = new RestTemplate(); EmployeeVO result = restTemplate.getForObject(uri, EmployeeVO.class, params); System.out.println(result); }
|
Spring Email
1 2 3 4 5 6 7 8 9 10 11 12 13 14 15 16 17 18 19 20 21 22 23 24 25 26 27 28 29 30 31 32 33 34
| <?xml version="1.0" encoding="UTF-8"?> <beans xmlns="http://www.springframework.org/schema/beans" xmlns:xsi="http://www.w3.org/2001/XMLSchema-instance" xmlns:context="http://www.springframework.org/schema/context" xsi:schemaLocation="http://www.springframework.org/schema/beans http://www.springframework.org/schema/beans/spring-beans-3.0.xsd http://www.springframework.org/schema/context/ http://www.springframework.org/schema/context/spring-context-3.0.xsd"> <context:component-scan base-package="com.howtodoinjava" /> <bean id="mailSender" class="org.springframework.mail.javamail.JavaMailSenderImpl"> <property name="host" value="smtp.gmail.com"/> <property name="port" value="25"/> <property name="username" value="howtodoinjava@gmail.com"/> <property name="password" value="password"/> <property name="javaMailProperties"> <props> <prop key="mail.transport.protocol">smtp</prop> <prop key="mail.smtp.auth">true</prop> <prop key="mail.smtp.starttls.enable">true</prop> <prop key="mail.debug">true</prop> </props> </property> </bean> <bean id="preConfiguredMessage" class="org.springframework.mail.SimpleMailMessage"> <property name="to" value="somebody@gmail.com"></property> <property name="from" value="howtodoinjava@gmail.com"></property> <property name="subject" value="FATAL - Application crash. Save your job !!"/> </bean> </beans>
|
1 2 3 4 5 6 7 8 9 10 11 12 13 14 15 16 17 18 19 20 21 22 23 24 25 26 27 28 29 30 31 32 33 34 35 36
| import org.springframework.beans.factory.annotation.Autowired; import org.springframework.mail.MailSender; import org.springframework.mail.SimpleMailMessage; import org.springframework.stereotype.Service; @Service("mailService") public class ApplicationMailer { @Autowired private MailSender mailSender; @Autowired private SimpleMailMessage preConfiguredMessage; * This method will send compose and send the message * */ public void sendMail(String to, String subject, String body) { SimpleMailMessage message = new SimpleMailMessage(); message.setTo(to); message.setSubject(subject); message.setText(body); mailSender.send(message); } * This method will send a pre-configured message * */ public void sendPreConfiguredMail(String message) { SimpleMailMessage mailMessage = new SimpleMailMessage(preConfiguredMessage); mailMessage.setText(message); mailSender.send(mailMessage); } }
|
1 2 3 4 5 6 7 8 9 10 11 12 13 14 15 16 17 18 19 20
| import org.springframework.context.ApplicationContext; import org.springframework.context.support.FileSystemXmlApplicationContext; public class MailerTest { public static void main(String[] args) { ApplicationContext context = new FileSystemXmlApplicationContext("application-context.xml"); ApplicationMailer mailer = (ApplicationMailer) context.getBean("mailService"); mailer.sendMail("somebody@gmail.com", "Test Subject", "Testing body"); mailer.sendPreConfiguredMail("Exception occurred everywhere.. where are you ????"); } }
|
